Coffee Codex - Dropbox Magic Pocket II
Introduction
I’m at Dote in Bellevue, WA. In a previous post, I started learning about Dropbox’s Magic Pocket (MP) technology. I started covering the data model of Dropbox Magic Pocket and how files get converted into blocks, buckets, and volumes.
Intra-zone architecture
As mentioned in the last post, MP is is a multi-zone system, so data is stored across multiple zones. However the magic that happens within each zone is even more fascinating.
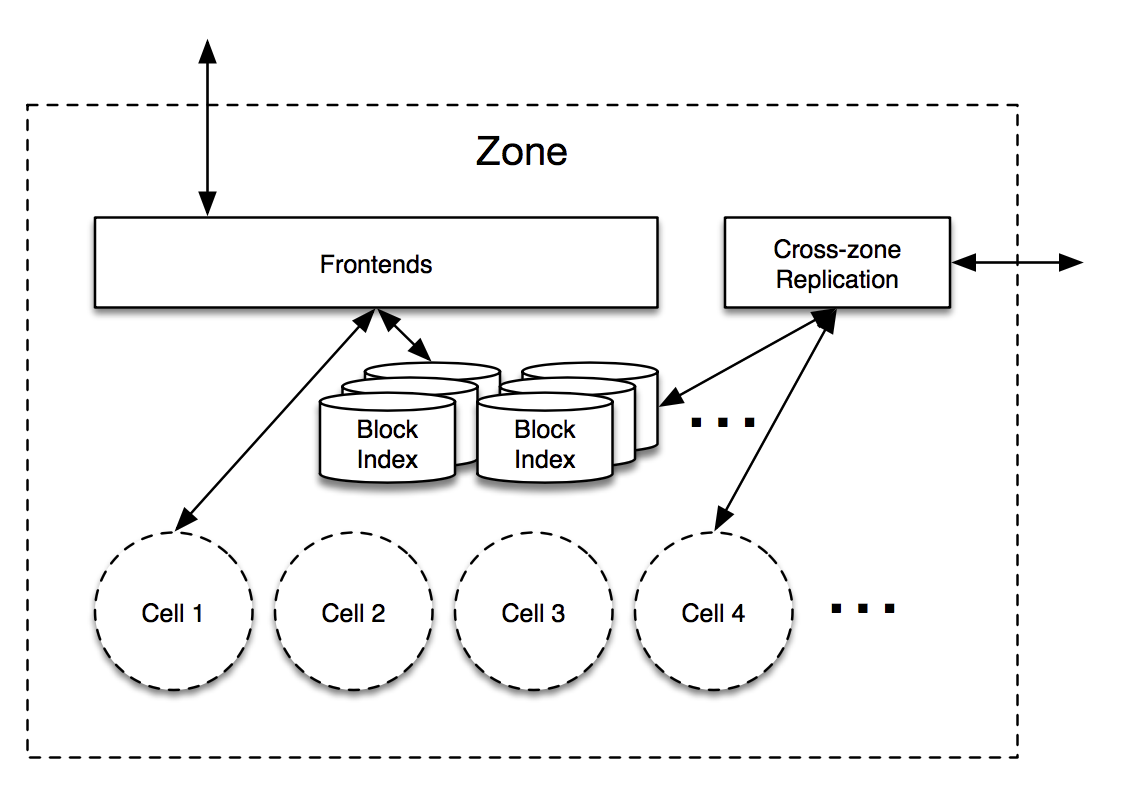
Like most distributed systems, each zone has a frontend fleet that is responsible for processing the request and act as a gateway to Magic Pocket. The frontend is responsible for deciding where blocks should be stored.
The block index takes the data and maps it to a cell in the system. The block index is as a MySQL database but is easier thought of as a KV store mapping a hash to a cell, bucket, and checksum.
hash -> (cell, bucket, checksum)The hash is a SHA-256 hash of the customer’s content.
So far the flow looks like this:
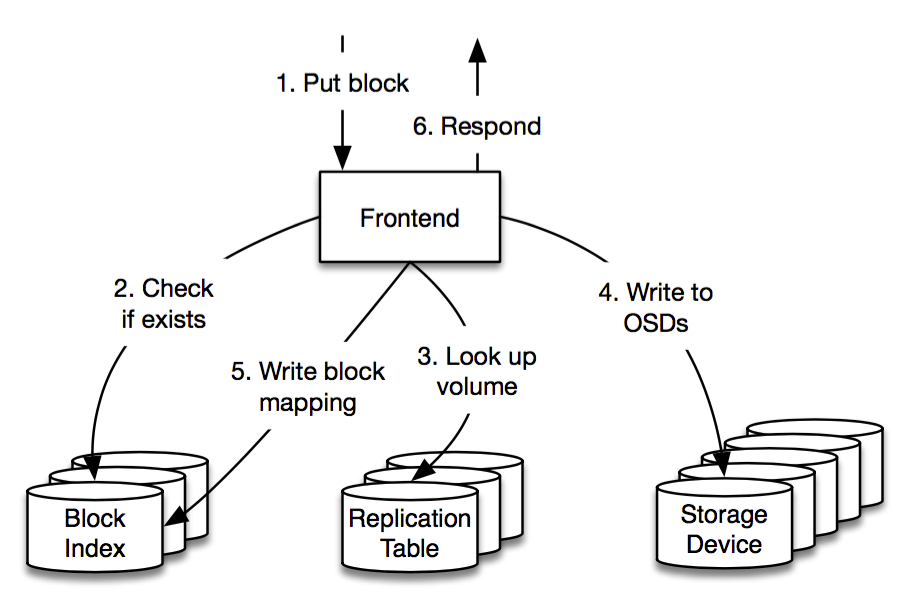
When a client makes a PUT request:
-
The frontend checks the Block Index to see if the block (by SHA-256 hash) already exists.
-
If it doesn’t, the frontend chooses a target cell to store the block. The selection is based on available space, load balancing, and minimizing network hops.
-
Once the block is successfully stored, the frontend updates the Block Index with the new mapping: hash → (cell, bucket, checksum)
In the background, the cross-zone replication daemon is replicating the data across cells. This approach seems to differ from S3, which is strongly consistent. By having a daemon handle the replication, it seems MP opted for an eventually consistent system.
Cells
Each cell stores about 50PB of data and is architected like this:
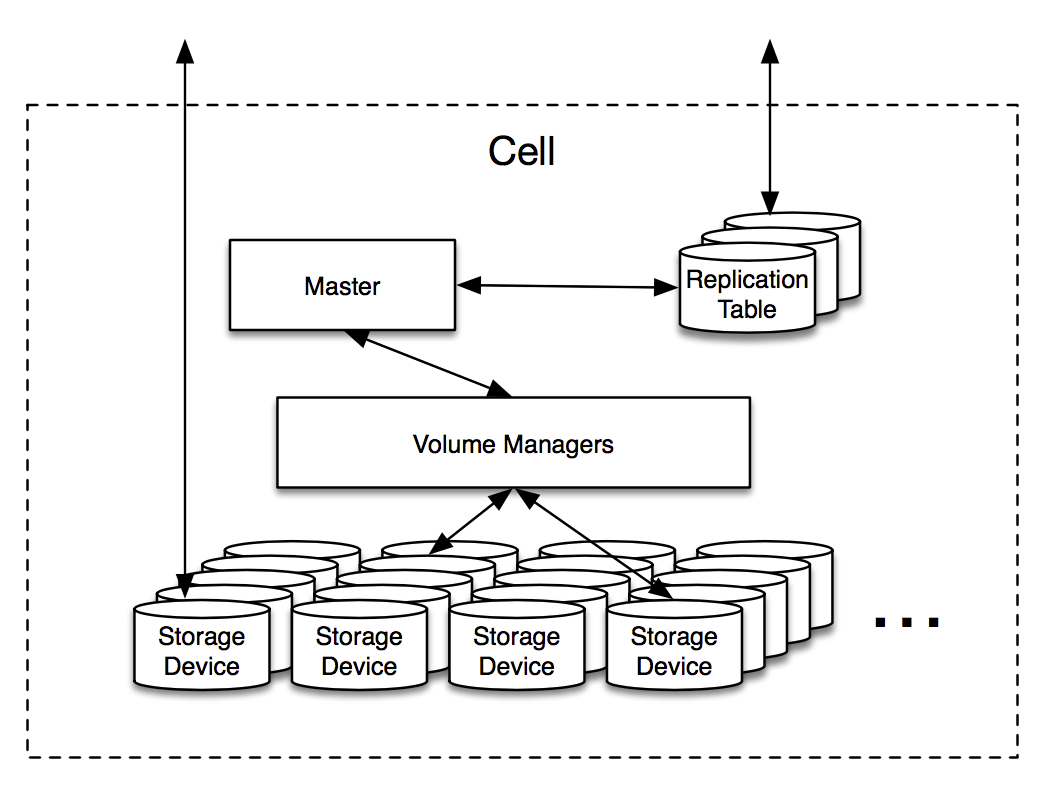
Each Magic Pocket cell is made up of Object Storage Devices (OSDs), which are machines packed with disks, each capable of storing over a petabyte of data. Despite their large capacity and internal complexity, OSDs are treated as “dumb” nodes that simply store data and do not take part in coordination or decision-making.
The Replication Table is a lightweight, in-memory index within each cell that maps logical storage buckets to the physical volumes and OSDs that store them. It’s implemented using a small MySQL database that rarely changes and fits entirely in memory, which allows for fast, high-throughput lookups. The schema connects a bucket to a volume, and a volume to its associated OSDs, along with metadata like whether the volume is open or closed, its type (replicated or erasure coded), and a generation number for consistency tracking.
bucket → volume
volume → (OSDs, open, type, generation)
Only a few volumes are open for writing at any time, while closed volumes are immutable and safe to move or repair. This open/closed distinction is crucial—it simplifies consistency protocols by separating live writes from background operations like garbage collection and repairs.
Each cell has a single Master that acts as the coordinator, handling background tasks like data repair, garbage collection, and creating new storage buckets. It doesn’t sit on the data path, so reads and even writes can continue without it, making the system more resilient while avoiding the complexity of distributed consensus. In that sense it’s it’s more of a janitor daemon.
The Master’s most critical role is handling Repair, which kicks in when an OSD fails and triggers re-replication of its volumes. By monitoring OSD health and waiting 15 minutes before initiating recovery, the system balances avoiding false alarms with minimizing data vulnerability, and can efficiently rebuild lost volumes using data spread across hundreds of other OSDs.
Volume Managers handle the actual data movement in a cell, carrying out tasks like migrating volumes or applying erasure coding based on instructions from the Master. They run on the same machines as the OSDs, making efficient use of available network and compute resources during these intensive operations. They are also not on the critical path since they respond to the Master.
PUT Request
I think this part is best thought of using code.
type BlockHash = string;
type Cell = string;
type Bucket = string;
type Checksum = string;
type Volume = string;
type OSD = string;

class BlockIndex {
  checkIfExists(hash: BlockHash): boolean {
    // Abstracted: Query the MySQL Block Index
    return false;
  }

  writeMapping(hash: BlockHash, cell: Cell, bucket: Bucket, checksum: Checksum): void {
    // Abstracted: Insert new block mapping into Block Index
  }
}

class ReplicationTable {
  lookupVolume(bucket: Bucket): Volume {
    // Abstracted: Look up volume for given bucket
    return "volume-123";
  }

  getOSDsForVolume(volume: Volume): OSD[] {
    // Abstracted: Return list of OSDs that hold this volume
    return ["osd1", "osd2", "osd3"];
  }
}

class StorageDevice {
  writeBlock(osd: OSD, data: Buffer): boolean {
    // Abstracted: Write block data to specified OSD
    return true;
  }
}

class Frontend {
  private blockIndex = new BlockIndex();
  private replicationTable = new ReplicationTable();
  private storageDevice = new StorageDevice();

  handlePut(hash: BlockHash, data: Buffer, cell: Cell, bucket: Bucket, checksum: Checksum): boolean {
    if (this.blockIndex.checkIfExists(hash)) {
      return true; // Block already stored
    }

    const volume = this.replicationTable.lookupVolume(bucket);
    const osds = this.replicationTable.getOSDsForVolume(volume);

    let writeSuccess = true;
    for (const osd of osds) {
      const success = this.storageDevice.writeBlock(osd, data);
      if (!success) {
        writeSuccess = false;
        break;
      }
    }

    if (writeSuccess) {
      this.blockIndex.writeMapping(hash, cell, bucket, checksum);
    }

    return writeSuccess;
  }
}

// Usage
const frontend = new Frontend();
const success = frontend.handlePut(
  "abc123hash",
  Buffer.from("example block data"),
  "cell-a",
  "bucket-001",
  "checksum-xyz"
);

console.log(success ? "Block stored successfully." : "Block storage failed.");
GET Request
The GET request uses the same structure as above, but without writing to the block index or OSD
handleGet(hash: BlockHash): Buffer | null {
    // Step 1: Look up the block location in the Block Index
    const mapping = this.blockIndex.lookup(hash);
    if (!mapping) {
      return null; // Block not found
    }

    const { cell, bucket, checksum } = mapping;

    // Step 2: Look up the volume and OSDs from the Replication Table
    const volume = this.replicationTable.lookupVolume(bucket);
    const osds = this.replicationTable.getOSDsForVolume(volume);

    // Step 3: Attempt to read the block from an OSD
    for (const osd of osds) {
      const block = this.storageDevice.readBlock(osd, hash);
      if (block && this.verifyChecksum(block, checksum)) {
        return block; // Successful read and verification
      }
    }

    // Step 4: Fallback (e.g., reconstruct from erasure coded data, not shown here)
    return null;
  }

verifyChecksum(data: Buffer, expectedChecksum: Checksum): boolean {
// Abstracted: Verify block integrity
return true;
}
Reading from an erasure-coded volume is optimized so that each block can usually be retrieved from a single OSD, minimizing disk access and load. If that OSD is unavailable, the Frontend reconstructs the block using encoded fragments from other OSDs, with help from the Volume Manager.
Of course, there is a lot more complexity in regards to how MP is able to recover, repair, and optimize data, but unfortunately my time at this coffee shop has come to an end. See you next time!